Day 10018

Hello! A few updates for my readers...


While working in the bus during a rain storm, I marked where all the drips were coming through the ceiling. I had a few pop-rivets leaking, as well as the seal around the forward hatch. I sealed up what I could with RTV, but another shower proved that the seal around the hatch would require more attention. For water-proofing, the hatch has factory-installed tape, a thick layer of cracked sealant applied by the school district, and my judicious application of RTV. None of these measures have kept water out, so I went with a scorched-earth policy and a liberal application of rubberized undercoating. I burned through an entire can, putting three thick coats on the seal around the hatch. Now I'm just waiting on some more rain to see if it will keep water out.

Is it really undercoating, if it's on top? Overcoating? Think about it.


Going through the hatch is like climbing out of the conning tower of a U-boat. A yellow U-boat... in the woods...


I spent some time last weekend, on Day 10011, moving some poplar logs at the camp up north with my grandfather. We used dad's tractor as a skidder. The backhoe is a great tool; it's a crappy cable skidder, an awkward crane, a clumsy bucket loader, a poor excuse for an excavator, and a horrible bulldozer. You can do anything with it! A veritable Swiss Army knife of a machine. I learned a bunch of new tricks and techniques from my grandfather, which I will surely apply in months/years to come.


After some deliberation, I figured out how I would put curtains in. Instead of trying to bend a bar to match the ceiling's curve, that a typical curtain could slide on, I removed panel screws from the ceiling and threaded in eye-screws.

"Not to be used as a chisel, punch, or prybar," said the screwdriver. Ha!


I ordered a pair of cotton duckcloth shower curtains (Made in USA, of course,) which have metal grommets every few inches, instead of a sewn fold which a curtain rod would go through. With a pair of snapring pliers I spread the eyelets to accept the grommets. I can easily open and close the curtains by latching and unlatching the last grommet on the curtain from an eyelet. 

I ordered two curtains to start, which I installed halfway through the bus, but I will probably get another pair to separate the cockpit from the cabin. This set of curtains hangs between the beadboard and barnboard on the wall, and separates the kitchen from the bedroom.


Look, a semi-private bedroom!


The pace of work has been noticeably slowing. While sitting on the futon, contemplating, I came to the realization that I was past 80% on the interior. It's "done." One of the policies of Lockheed's "Skunkworks" team was to build good-enough 80% solutions; striving to achieve perfection on the last 20% of a project takes just as long as the first 80%, and is just as expensive. They would use a part off-the-shelf if it was available, instead of designing a new component to do something on their aircraft. The proof that this works is in the U-2 and SR-71. The 80/20 rule is something I've tried to capture in the "it's not the space shuttle" philosophy to building.

So while the bus interior isn't climbing above the USSR or busting Mach 3, it is pretty comfortable.


Day 10009

Hey all! Progress has been slow over the past two weeks; probably because I've finished most of the "easy" interior projects, am hesitant to start one of the bigger projects like electrical or water, and haven't had a chance to acquire much to move forward.

What I have done is finished trimming up the shelves; adding a lip of pine makes them look much better, and they should hold items better when the bus is driven somewhere.


I've only hit my head on this shelf four times. Learning has occurred? I think? I don't remember. What?


Something that seemed like an easy afternoon task was removing the double doors. I had pulled the driver's latch off the dash a few days prior. The doors came off without too much effort; I had to open a sheetmetal panel above the doors inside to disconnect the piece that connects the door hinges. The hardest part was removing the back-side door-hinge from the sheetmetal of the cabin. I imagine that the RTV that holds this steel hinge on has a higher tensile breaking strength than the bolts that held it in. After chiseling away at the RTV for nearly an hour, I was able to pry the hinge off the cabin. I imagine I will repurpose this piece to hold a folding table on the bus's exterior.


The start of a traditional door.


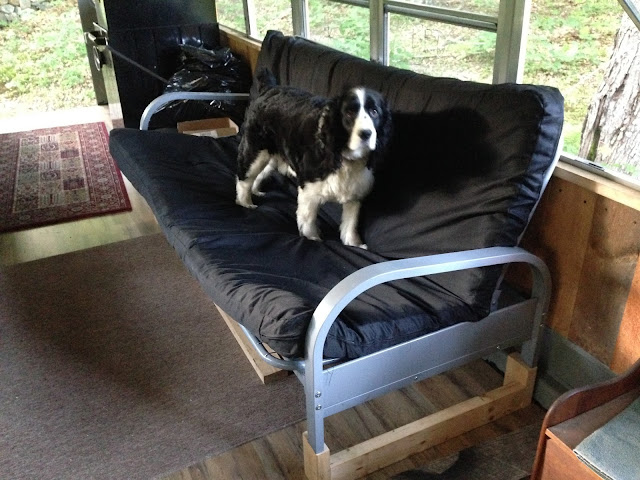
On Day 10007 I met up with Iain and Darcy, who bestowed upon me a trusty futon mattress and frame, free of charge. Thanks Iain and Darcy! At about 54" wide, I still have enough room to walk by my Ikea friend/piece-of-furniture Hemnes, who identifies as a dresser, with the futon folded down. To make it fit over the wheel wells, the frame needed to be elevated about six inches. I also wanted to retain the ability to fold the futon down, so that one man and one dog, one man, one dog and one duck, one cat, or whatever combination could share the bed comfortably.


My product tester informs me it is adequate for his purposes. I sat and pondered how I was going to do this for a while, reminding myself that it wasn't the space shuttle. I built little 2x4 frames to lift the frame over the wheel-well...


... then to hide the 2x4's I repurposed the weathered scrap stakebed sides of my old F350 (my old old one, not my new old one.) This whole bus-building endeavor has allowed me to put to use a lot of unused things, and clear out the barn a bit. And use the Sawzall a lot.


The mattress cover and pillow came from my mom's stash.


In the grand scheme of things, I'm reconsidering the compositing toilet being on the inside. I think I'll just build a nice outhouse as one of my first projects, once I have land. I feel like the interior is all set, as fas as furniture goes. 

On my to-do list is the woodstove, which needs a stone floor, a heat shield, and a chimney. The water tanks need to be mounted and plumbed, and I need to figure out a water pump. The inverter panel needs to be created and installed, and to get that done I need the four Trojan T-105 golf-cart batteries for my battery bank. I think Electrical is the direction to go next.

I want to paint the exterior.

On the F350 I need to install a gooseneck hitch and get a trailer, so I can move the backhoe. I got a B&W turnoverball hitch, which mounts to the truck frame, but it's going to be a project to get that installed.

The backhoe is leaking like a sieve at the backhoe valve control. I really need to take that apart again, and either repack it or get the spools cleaned up, which is a "whole weekend" project. If I'm going to do that I might as well get a pressure washer so I can clean it again. 

Good thing I like these projects!

Day 9998

I know I left you all with a cliffhanger with my last post. Welding needed? Let's be honest, you were probably saying to yourself something like; "Oh no! The cheap craigslist farm truck has a cracked frame cross-member! Then Aaron pulled the truck bed off with a backhoe instead of going to a professional!"

And now, the conclusion...

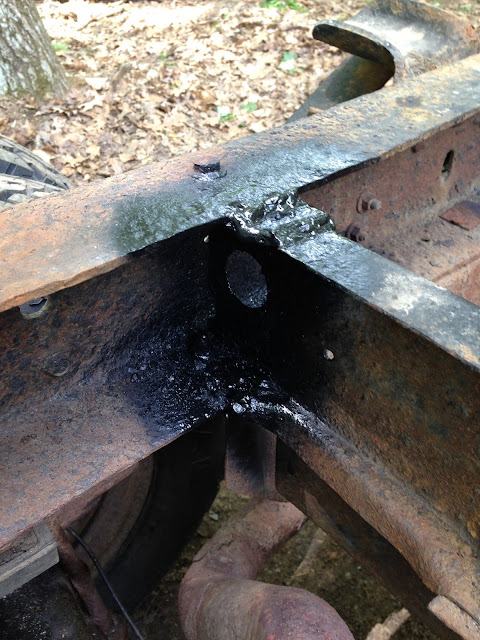
Here's one of our cracks.


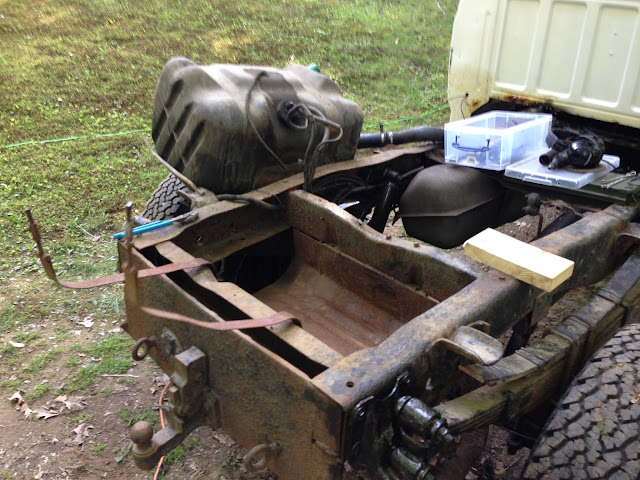
I cut the straps on the aft plastic fuel tank, and without actually disconnecting it, set it out of the way. I'm less concerned about sparks and fiery explosions (it's only diesel) than I am about damaging the plastic tank as the metal frame heats up from a weld. 


For this crack I added some scrap metal to the frame to bulk up the area. I ground the rust off the area to be welded so I could run a smoother, cleaner bead.


I promise, despite how these look, that they have good penetration into both metals. I used #6011 rod, which does better with rust, but typically comes out looking like it's the first time you've done it. I tried a bead of #7018 on here but I kept losing the arc on rust spots. #6011 is known as "Farmer's rod."


After cleaning off the slag I put a thick coat of paint on the fresh weld.


And while I had the bed off, I went to town with the Fluid Film. I've sprayed about seven cans onto the truck's frame, and it looks so much better. Not only does Fluid Film smell amazing, and stop corrosion in it's tracks, but it blackens the frame again, too.

I reinstalled the fuel tank, and added the fuel fill line. I didn't finish that job this weekend; they are still very difficult to get to. I need some more fuel hose.


Bed back on! It actually went on pretty smoothly; I lifted it up with the backhoe, then drove the truck under it as close to center as I could get. I gently set it down, loosened all but one strap, then used the farm jack to pull it straight onto the frame.


Remember those threaded rods I cut off with the angle grinder? These are replacing them. I got custom U-bolts bent up at Central Auto Recycling in Concord. We had a miscommunication, based on the clarity of my highly technical drawing (not-to-scale pencil sketch on notebook paper,) and one pair of U-bolts was too short to reach. Central Auto gave me another set on the house. Thanks guys! 

The flat pieces on top are pieces of 3"x1/4" steel stock, cut with an angle grinder, then pain-stakingly drilled out with a 5/8" hole saw on a 1/2" drill... I need to invest in a drill press. They all went on pretty smoothly, and now the truck bed is secured again!


In the bus I was able to do some work this weekend. Perusing craigslist I found a set of four of the style of chair that I wanted. Brent, from Craigslist, was kind enough to meet me halfway in Manchester on a Sunday afternoon. I can sit down now!


I also installed the shelves, which still need trimwork. The shelf over the bed-to-be I added another board to, so that large books would fit standing up. To keep it more stable and less flimsy, I backed off a screw on the ceiling, wrapped 550-cord around it, then tied it off to an eyebolt on the shelf. When all the strings were nice and tight, I put a dab of epoxy on my knots. You know what they say; "If you can't tie a knot, tie a lot... and put a dab of epoxy on it."


On a final note, Dave showed me this cool video of what happens to our old school buses in Central America. These trambillas or chicken buses are cruising all around Guatemala, and some are very well done!


Day 9995

The focus of the past few days has remained on the F350. I had it inspected on Day 9994, and the shop said it looked good, except I had a cracked frame cross-member which needed welding. With the help of my coworkers, I crawled under the truck and tried to find the crack, and found three or four cracks that the shop could have been talking about!

The shop referred me to the welder up the street (the same guy who turned down a very simple welding request I had over a year ago, which put me into rage-mode and prompted me to take a welding class at MCC and buy my own stick welder.) I saw dollar signs as I imagined someone removing the truck's bed, pulling the rear fuel tank, making the weld, and putting it all back together. Instead of letting someone else rob me blind, I mentally started going through how I'd do the job myself. After the shop showed me what had to be welded (and told me what a good weld was, assuming I was some cheap hick who was just going to throw a bead of 6011 on the rust and call it good,) I knew I could make an attempt at the surgery.

My welding experience outside of the classroom is several backhoe repairs with 6011, which all came out horrible but continue to hold, and several modifications like additional hooks, chains and brackets, which have all come out alright with 6011 and 7018, and also continue to hold. I think I'm ready to start welding truck frames.

First things first, I had to move the backhoe into position behind the truck, to lift the bed off the frame. To do that I had to shuffle the backhoe and bus. I backed the bus up to make room. Pro-tip; make sure your toolbox drawers are locked, or the slightest rolling motion will cause your toolbox drawers to open and exceed the critical angle past a pivot point. I feel like I've heard that somewhere before...

My previously well-organized tools scattered across the floor, my bottom drawer bent, I went into combat mode. Don't feel now; feel later. Accomplish the mission.

The Horror. The Horror.


I parked the backhoe, put the stabilizers down, and raised the bucket. Then I backed the truck up until the bed tapped the backhoe's frame, and set the bucket down on the truck bed. The bed was held on with threaded rod and nuts; most I was able to loosen and remove, but I used the angle grinder to cut at least three of them. One cannon plug and three cut wires disconnected the lights. I used ratchet straps to secure the bucket to the bed.


Have I mentioned recently that I love my backhoe? Despite leaking a near steady stream of hydraulic fluid, it is the ultimate $3000 power tool. This '66 or '67 Case 580 Construction King's identiplate is long gone; probably squished into the dirt of a skidder trail somewhere in southern New Hampshire before I was born. It lifts. It pushes. It pulls. It smokes. It leaks. It has an oversized bucket on the hoe. It has welded repairs older than me. It blows hydraulic lines and looks like the android from Aliens when he is dying.

The Case, which was manufactured a few years before Men walked the Moon, easily lifted the bed off the frame rails.


I set the the bed down, shored it with some 6x6's, and left it strapped to the bucket so nothing would move. I began inspecting the truck's frame from the top, and looked at my next welding project.


My truck frame exposed, I looked at the aft fuel tank which has a cap over the fill port, at the bent pintle plate hanging off the back of the frame, at the open space where a dump piston would go, and the pieces of threaded rod that held the bed on. How much time and money am I going to spend on this project?


I decided that, in addition to the crossmember weld repair, I would remake the fuel fill lines while I had the bed off. I'll also replace the bed's attaching hardware with some stronger U-bolts. Most importantly, I would give the frame a righteous and thorough coating of Fluid Film. This is a lanolin-based (that's sheep's wool) material that stops corrosion, and forms a protective coating on the metal. It is pretty harmless to the vehicle's plastic and paints, as well as the environment. It's also one of my very favorite smells; like a sweet pine tree.


I made a mess today! I hope to have the bed back on my the end of the weekend. With the truck inspected, I will continue on the bus with the electrical panel.

I wear the Guatemala pants for my comrades still serving in the jungles of Coatepeque. Never Forget.


Day 9993

Back on Memorial Day, Day 9991, I continued a few small projects. Hemnes, my Swedish named dresser from Ikea, needed another 4.5" to clear the wheel well. I didn't want to box up the wheel well because it's a cool bus feature, and it would be a lot of work, so I took my Sawzall to a shipping pallet instead.


The shipping pallet was built by someone who's T-square was badly mangled at some point, but he chose to continue using it. In lieu of measuring I held the pallet chunks up next to the wheel well, made some educated guesses, and swagged where the cuts should be. I took a little more off than I wanted to, but I think it looks alright.


I added another handle to the back of the bus to make the climb up a little easier.


I have received more questions about this corner of the bus than I would have expected. I have been asked "where will you go to the bathroom?" many more times than "will you sleep comfortably?" or maybe "how will you cook food?" or "do you even know how to use a chainsaw?"

This is a composting toilet. I haven't used it yet, and probably won't while I still have porcelain and plumbing, but you can be sure that I will post a review when I do!


Monday afternoon my parents came back from the North Country bearing gifts; furniture and a wood stove from the Grandparents! 

First up is the wood stove. This little Scandia stove is exactly what I had in mind, and my grandparents just had one lying around. My dad and I briefly assessed the weight while unloading it from the car, and agreed that using the tractor to load it in would be prudent.


I'm planning on routing the chimney out a window, through a rectangle metal insert. I've seen a lot of skoolies go through the roof, but I'd rather not do that kind of major surgery. It's not the space shuttle; sticking it out a window will work just fine.

Looking forward from the rear axle; grandparents donated a nice wooden bench, which opens up, that I'll probably put firewood into. If I can have one piece of furniture do two jobs it makes a big difference in available space. I also have another carpet, and the little Scandia wood stove. I'll probably put bricks down under the woodstove, then build up a heat shield nook where it is next to the counter.


Looking back from the rear axle; dresser over the right dually, workbenches with stained birch plywood, toolbox and ejection seat... I mean composting toilet.


Today the F350 got new shoes in the form of six General Grabber AT2's. I had Town Fair Tire remove the chrome inserts in the duallies, then I hit the wheels with some dull black spray paint. The hoist got a coat of Caterpillar Yellow (one of my favorite colors.) I have a case of Fluid Film spray cans, a lanolin based corrosion prevention compound, on the way for the truck's frame. US flag sticker installed on left fender. My new farm truck definitely came with some free field mice in the vent system; I left out traps tonight.


Next project is the shelves over the windows, and the Inverter's electrical panel.