Day 10053

To finish up the electrical project, I re-purposed a 14/3 gauge extension cord that had met its gruesome end tragically at the hands of a lawnmower. I wired a few good feet of the cord into the Bogart Engineering TM-2030-RV Trimetric battery monitor, and soldered terminal ends onto the other side of the cable for installation onto the shunt. 


A separate 12-ga wire goes from the monitor to the positive end of the battery bank; in this way the monitor looks at the whole battery system. I had to move one of the negative terminal ends to the other side of the shunt so that the monitor could "see" the current passing through the shunt when the bus's alternator was charging the bank.


The Magnum inverter's manual flows and reads well; it was easy to understand and made the install easy. The Bogart manuals jumped around and were harder to understand, but the monitor itself is pretty easy to use with its two buttons. Once you have it wired correctly, the user's manual is pretty clear about how to change the parameters to monitor whatever setup you have. 


A normal car battery doesn't sit at 12 volts, waiting to be used. It sits at 12.6v if it's healthy, and gets recharged by your alternator at about 13.5-14.0v. A battery down to 11.8v is toast. Likewise, my bank of golfcart batteries is fully charged at 12.74v, and they need 14.8v to get charged.

The bus isn't giving me enough volts to get a full charge; I need to figure out how to get the voltage regulator on the alternator to push out 14.8 volts. I don't really know how to do that! Below is the voltage regulator off the alternator, with the two spring-loaded brushes popping out.


I found a backhoe part I needed on craigslist; this is a Case model 33 backhoe pedestal, which includes the hydraulic control valve for the backhoe. Mine has a pretty bad leak, and it doesn't appear I can get it repaired without it costing an arm and a leg. Getting a spare off of craigslist; way cheaper. When it cools down a bit, I plan on going through the backhoe and changing out this pedestal, and changing all of the fluids. That will be a long weekend project.


Many thanks (and congratulations!) to John and Taylor for the foam pad for the futon. The authentic space-age memory foam, hand-made by artisan astronauts and cosmonauts in the International Space Station, is quite nice, and the futon is much comfier.


I started painting the bus with Kilz primer. I attacked it with a brush to get into all the nooks and crannies. It was slow, but I seem to enjoy painting.


It's remarkably like painting a barn.


The Kilz seems to be holding up pretty well; I scuffed up the bus's paint with a rag, wiping dirt and pollen off of it.


On the second floor I started off with a brush...


... and finished using a roller, which went much faster on the smooth roof.

I'm going to keep the "2," I'll repaint it. Bad luck to change names. This is Bus 2


The roller doesn't work so well on the sides, with all the skirting, however.


 I need more paint. This is the end goal;


Day 10045

Today's project was to get as far as I could wiring the inverter and the battery bank into the bus. After being hesitant to start an expensive and riskier project (i.e., burn the bus down if I screw it up,) I attacked the project early this morning. 

I started off by taking the angle grinder to one of my surplus shelves, trimming it to size, and laying out my electrical components and trying to envision the flow of the system based on the resources I had.


 The shin sheet-metal panel, mounted on the frame behind the driver's seat.


Inverter, shunt and fuse mounted to the panel. On a wall panel, the inverter can only be mounted in two directions, and I didn't have the debris shields to mount it "up and down." The inverter, which must weigh about 50 lbs, is mounted through a pair of L-bracket stiffeners to help the panel stay strong. Thanks for the help on this Stephen!


I had to make a few of my own battery cables. I filled the terminal lugs with solder, kept liquid by a soldering iron and a torch working together, then plunged the end of the cable into it. While it was still hot, I crimped it by squeezing it in the vise. Not having any heat-shrink pieces large enough, I gave the ends a liberal wrapping of electrical tape to keep moisture out.


My hand-crafted cables installed on the inverter. The 3/0 (pronounced "three ought") cable was very rigid, and each cable was test fit several times and trimmed to size. The orientation of the lugs was the most difficult part; I had to have the cable bent to it's final shape before I could put the second terminal lug on. 


Making progress. To help prevent chafing, a union for 3" PVC pipe, which has an outside diameter of 4", was installed into my floor. To find this perfectly sized piece of pipe, I took a packaged tape measure for a test drive in the plumbing section at Lowes, but then returned it at the end (forgot my calipers at home.)


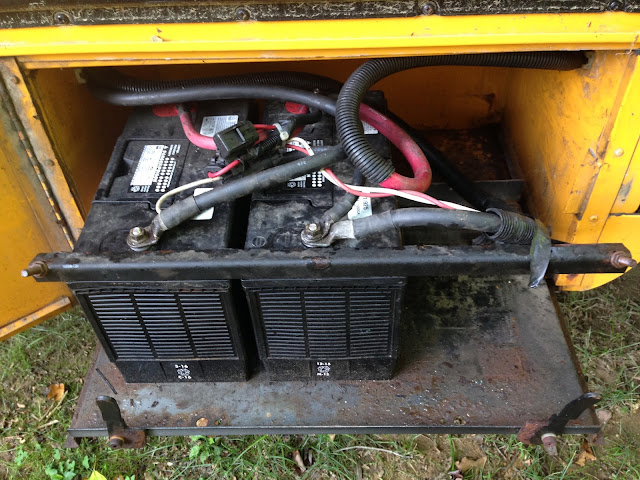
The battery bank had to be adjusted several times to make all the wires fit. I took the negative-to-bus-frame ground off, as all negative wires have to be routed through the shunt on the panel, and ran it up through the floor to the shunt. The black cable with red duct tape is the DC positive lead up to the fuse on the panel. The little black box on a terminal lug in the back is the battery temperature sensor. I also drilled new holes so the battery clamp rods could be used again. Closing the tray is a little tricky now! Lots of wires and not much space.


Things are coming along! Measuring 12v DC between the shunt (lower middle) and the end of the fuse-block (top left with red cables.) I checked several times as I went along to make sure the right kind of power was getting where I needed it to go.


300 Amp fuse installed. This will protect my system and keep the thick 3/0 wires from melting if anything goes wrong. With the fuse installed, the 12v DC system up to the inverter is now energized.


Moment of truth... I pushed the tiny gray button... the little green light is flashing, and I can hear the fans whirring. The inverter has power!


I ran the bus again to make sure the negative-to-bus-frame ground being removed wasn't going to affect anything, as it appeared to be redundant, then walked around trying to electrocute myself by touching things. I didn't get zapped! Also the bus still hasn't burned down.

Now that the "backside" of the inverter is wired, I will do the "front" tomorrow. I'm planning on using extension cord for the wiring of 120V AC system. The bus has front and rear engine block-heater outlets mounted on the bumpers... so I know where I could find a decent heavy duty cable that's about 25' long! 

The fewer trips to the store, the better.

Day 10043

Ouch, 10043? I haven't posted an update in a while. Unfortunately that's because I haven't done much work on the bus in the past few weeks, as I was at a course for work. I'm hesitant to post updates without any real content; I assume my readership is here to see progress, not read about how I'm feeling about the lack of progress I'm making!

Distance and time away from my project has given me perspective, though. I really have three things left that I need to do;
1.) Wire in the battery bank and inverter
2.) Install and plumb the water tanks
3.) Paint the exterior

If I get those three things done, I will have gotten the entire project to 80%, and the bus will be ready to go out and colonize. I'll hitch my 7.3L Powerstroke oxen team to my modern Conestoga wagon, and head North.

To accomplish the above I've done a lot of research into the electrical system, and ordered a lot of parts online after not being able to find what I needed locally. If you, reader, ever do a conversion like this; sometimes you need a home depot, sometimes you need an Autozone, and sometimes you need both. That's where the internet comes in. It came as a surprise to me when I found all the electrical components I needed on a website for Marine electrical systems. Alternative energy stores, like alt-E in Boxborough, Mass., have a lot as well. Everything I've seen on RV websites/stores has been cheaply made and three times the price it should be.

Secondary projects include the fireplace for the winter, and some kind of exterior setup (awning? Camo net?) for shade outside. I guess I should install a door at some point, too. Ehh... details.

First up, I toured a few parcels of land on Day 10040. One has an abandoned farmhouse, a stream that feeds a lake, and good timber! The old barn, long gone, had a fieldstone foundation.


The house, a fixer-upper, was of post-and-beam construction. Despite being halfway-collapsed, two of the bents are holding strong.


The land has a few white pines fit for ship's masts. Look at all that! That's a new house. I am seriously considering this parcel; it's at the top end of my price range, but has enough land and is in a good location.

On the bus, I pulled out the battery tray. These two massive batteries are connected in parallel (still 12 volts, but more amps) to crank over the big diesel motor when it's cold. I imagine they will end up in the F350.


I'm replacing these batteries with four Trojan T105 6v golf cart batteries. To keep my 12v system, I wired the four batteries into two pairs of two by bonding the positive and negative terminals. I effectively made two very large, two-piece batteries with the same voltage but a lot more amps. Using the bus's factory wire harness, I connected my two (four) batteries.


Using Yankee ingenuity, some minor guesswork, and blind dumb luck, I drilled a pilot hole through the floor, which would come out beside the battery compartment.


Voila, a 4" hole for wiring to pass through. I didn't hit any cross-members or wires! Success. I'm going to shove a piece of PVC in there... or something... I don't really know yet...


New battery bank, installed! The lights came on and nothing caught on fire. Other than a smashed finger and my ratchet producing a spark-show when it went across the terminals... a flawless install.


Next I will be putting terminal ends on wires (good luck finding 3/0 terminal ends anywhere but the internet,) and connecting the inverter to the battery bank. From left to right, the battery monitor will connect to the shunt on the negative side, to monitor the use of the batteries, and a 300 Amp fuse will protect the system on the positive wire.


Stay tuned for more.